Pages - Menu

Sunday, September 30, 2012

Mojo Monday 260

Hi all!

I hope that you've had a wonderful weekend so far.  I have been working away in my craft room whiping up all sorts of fun things that I hope to share with you soon.

But before it got to be late, I wanted to post my card for Mojo Monday Challenge 260.

Here is this week's sketch:

I have always balked the thought of making a card that isn't A2 in size.  But this was my week to try.  I went for the safe square option.  Here's my card:


I found this cute pink acorn paper from K & Company in my stash, so I decided to give it a try.  I used my Cricut to cut two acorns as my focal point.  I added a little contrasting turquoise border that had "Fall Fun" printed on it to tie everything together.

Well, that's it for this little post.  Thanks for stopping by and happy crafting!

Friday, September 28, 2012

Retro Sketch Challenge 30

Last post of the day, I promise!  And it's a good one!

Today is my first time officially playing along with Retro Sketches!  I've drooled over their challenges and have even made a card or two but never have managed to post them on time -- until today!

This is the sketch for Retro Sketches Challenge 30:


And here's my card:


I used Echo Park's Happy Day collection and Unity Stamp Company's Sending My Love Stamp set to create this fun little card.

Phew, did you make it through all three of today's posts?  Because I barely did!  Well, thanks for hanging in there with me as I played a little bit of catch up.  Anyways, have a fantastic weekend and happy crafting!


ACAD Non-Traditional Christmas Colors

As I warned you in my last post, I am back with the second post of the day.

This morning I challenged the Card-a-Dayers to create a Christmas card using non-traditional colors.  So here's what I came up with in case you needed some inspiration.

This first card is sticking pretty close to Christmas colors with pinks, burgundy, and green.  So I didn't really think too far out of the box on this one.  But it still counts!  It's not red and green, technically.


Wish I could take credit for the design on this card, but it really is just the paper's design.  I just cut it down to card size!  So this one was a total "cheater."  I do love that nutcracker though!

Next card is just neutrals, gray and black.  This card is about a step away from the traditional Christmas color box.  No red or green -- or anything else, for that matter -- on this card.


Moving a little further away from the proverbial box is the next card.  It's clean, simple and colorful.  


I used my Cricut (yes, it's still sitting out on my desk) to cut the letters.  I used foam adhesive to pop the white part of the sentiment and backed "bright" with a rainbow of colors.  I thought I was being original but right after I made it, I saw something super similar in the new November/December issue of Paper Crafts magazine.  D'oh! So much for trying to be original :)

Now for the last card.


I went for bold and graphic here.  This card is so far outside of the traditional Christmas box that I can't even see the box anymore.  If you look closely, I had a little issue with embossing my image.  As I was working with the card, the heated embossing powder began to flake off!  I've never seen that happen.  I guess there's a first for everything, bummer.

Well, that's it for me and my non-traditional Christmas color Christmas cards.  I hope it's brought you some inspiration and I can't wait to see what you come up with!


Paper Players Challenge 114

Wow, I can't believe another week has gone by.  Here we are, another Friday which means it's time for me to get my behind in gear and post my challenge cards.  So my apologies in advance you're about to see several posts from me :)  So hang onto your hats because here we go...

The Paper Players Challenge this week (click on the sketch below to go to the Paper Players site) was to create a card using this sketch:


I had a hard time getting my mojo flowing with this sketch because I didn't want to do the "obvious" flags here.  So I started with this little number:


I wasn't thrilled with it, so I gave in and went for the obvious flags:


Eh, it was fine but still not what I wanted, so I tried again:


Can you tell I have Christmas on the brain?!?!  I am so ready for the weather to cool down and the holidays to start!  But until that happens, I will just have to be satisfied crafting Christmas cards.

Thanks for stopping by, and be sure to check out the Paper Players Blog to see all the challenge details and the other player's fabulous cards!  There's still time to play until noon today, so be sure to check them out!

Thursday, September 27, 2012

Go Fish Challenge 25

The Go Fish Challenge Blog is celebrating their one year anniversary with a CAS anniversary card challenge.  

This is the card I created:


I still had my Cricut out, so I though I'd put it to good use.  Using the Cricut Craft Room, I cut the the sentiment out of white cardstock.  I rounded the corners and backed the heart with strips of colored paper.

To finish the card, I foam mounted the white cardstock on a black card base.

And there you have it, a clean and simple anniversary card.

There's still plenty of time to play a long so be sure to check out their blog and the challenge here.


Chip Challenge

This week's Card a Day Challenge by Bexx was to create a card inspired by our favorite chips.  My favorite kind of chip has to be Kettle Brand's Jalapeno chips.


Yum, yum!  (You may have noticed that the bag has been opened.  I couldn't help myself :)

This is my card:


I centered a green panel on a cream card base.  I used my Cricut to cut a sentiment.  And I added a little pop of red in the form of a little flower.

So there you have it.  A card inspired by a bag chips!


Thanks for stopping by and happy crafting!

Friday, September 21, 2012

CAD Inspiration Challenge

So this week's Card a Day (CAD) challenge was to create a card inspired by one of the other CAD bloggers.  This was such a fantastic challenge idea because there are so very many wonderfully talented CAD bloggers.  I have to say it was difficult to chose just one card that inspired me.

After much debating and back-and-forthing, I selected Kay's Christmas cards.

Photo from  http://kaypeterson.blogspot.com/
Photo from  http://kaypeterson.blogspot.com/

Don't you just love them?!?!  There's a third one in her set, but you'll just have to visit her blog to see it for yourself!  You can read about all three cards and see Kay's work on her blog, Tartan Magnolia.

And here are the cards they inspired:


I had every intention of doing colored cardstock for the focal point and card base, but I didn't have any coordinating red paper!  I used all the red cardstock for the wedding and never got around to replacing it!  See, I finish packs of cardstock from stash every once in awhile!

So I improvised and went with white for the focal point and card base layers.  I heat embossed the images and sentiments with colored embossing powder.  Since my stamps were quite a bit smaller than Kay's I had to fill the space somehow, so I added a bit of baker's twine and a paper button.

These cards were so quick and fun to make, I'm going to make a complete set!  Maybe I can even justify getting those awesome Tim Holtz stamps Kay used.

Well, that's it for me today.  And by my count I am FINALLY caught up with all the CAD challenge.  Yay!

Happy crafting!

Thursday, September 20, 2012

Ripped Paper Challenge

Just wanted to pop in with a quick post for the Ripped Paper Challenge from a couple weeks ago.  Yep, this is the other challenge I missed.  This one was a little challenging for me.  I wasn't sure where to go with this one.

This is what I ended up making:


Quite honestly, this is not one of my favorites.  I used papers from DCWV's Homespun collection.  I added a few buttons, a baker's twine "spool" and the stickered sentiment.  The stickers are from Echo Park's Hello Summer collection.

Well, that's it for today (that was a quick post; right?!?!).  Enjoy and happy crafting!

Wednesday, September 19, 2012

Fall Five Part 5

Today is the last post of the Fall Five.  So here's today's card:


This is the last of the owl paper cards, I promise!  But this paper was just too darn cute.  So this is one of my favorite go-to layouts to showcase all that pretty DP I've hoarded collected :)

So my question to you today is:  What are you looking forward to most this fall?

I had the opportunity to go up to Apple Hill this weekend.  For those of you who aren't familiar with Northern California, Apple Hill is a collection of working apple orchards in the foothills surrounding Sacramento.  

It's absolutely beautiful to travel out to the foothills to see all the trees changing color and to enjoy all the yummy apple/baked goodies.  It would have really felt like fall if it hadn't been 95 degrees outside with everyone walking around in shorts and flip-flops. 

Oh, well.  I still enjoyed my, almost, fall day at the apple orchards!  So I'm looking forward to going back up there when the weather cools a bit.

Thanks for stopping by and happy crafting!

Tuesday, September 18, 2012

Office Supply Challenge

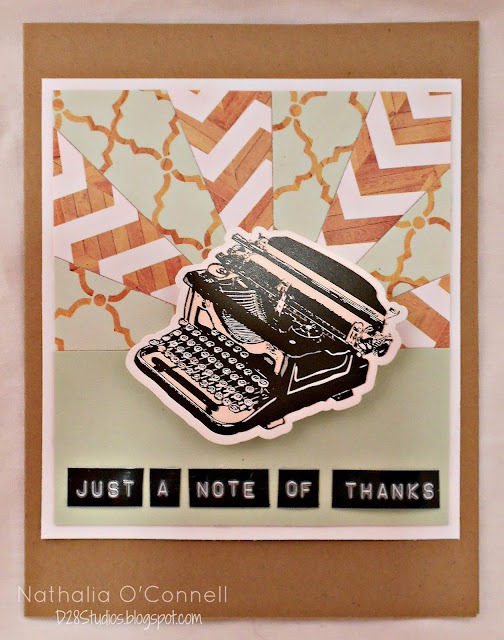
So a few weeks ago (I'm a bit behind) the Card a Day blog group had an office supply challenge.  I completely missed it!  So in the spirit of catching up (which was last weeks challenge) here is my office supply challenge card:


Like the Great Outdoors Challenge, I'm stretching the definition of this challenge a wee bit.  I included a typewriter sticker from Echo Park's Everyday Eclectic sticker sheet and used a label maker to create the sentiment.

I used paper from Echo Park's Everyday Eclectic collection and Papertrey Ink's Sunburst die (I'm not actually sure what the die's name is, and I don't see it on their website, sorry) to create the perfect sunburst background.

Two more challenges to go until I'm caught up!  Woo-hoo.

Thanks for stopping by today and happy crafting!

Monday, September 17, 2012

Jars of Joy Challenge

So I'm sure you've seen the canning-jar craze that's caught on lately.  I know that I've caught canning-jar fever.   So when I saw that Moxie Fab World was having a Jars of Joy Challenge, I knew I had to play along!  Here's my creation:


Over the summer, Bath and Body Works was having an auh-mazing clearance on their mini handsanitizers.  The sale was so good, heck, they were practically paying me to buy them.  I can't pass up a deal like that.  So I bought a BUNCH to make something cute out of to give to Hubby's co-workers.

So I noticed that when I held the handsanitizer bottle up to my Inkadinkado jar stamp, it "fit" inside the jar perfectly!  It was meant to be!  So I set to work to create a cute little jar box -- box jar?

Anyhow, I measured the bottle and made a little box for it to fit inside of.


Then I stamped and fussy cut the jar out of white cardstock and velum.

I "painted" the velum with water and a little Broken China Distress Ink to give it an opaque feel.

I attached the layers of the jar to each other, and finally attached the whole thing to the box.  I repeated the process to create a second jar for the back of the box.

To embellish the jar, I created a little label using an EK Success punch and Prima cardstock.  I stamped the sentiment using Papertrey Ink's Gracious Vases Stamps (how befitting to use Gracious Vases to create a Jar of Joy :) )  I added a little ribbon and a gold heart charm to the rim of the jar.  And there you have my Jar of Joy!

Well, that's it for me today.  I hope that you'll check out Moxie Fab World's Jars of Joy Challenge and play along!  There's still plenty of time.  The challenge doesn't end until October 8th!

Thanks for stopping by today and happy crafting!

Saturday, September 15, 2012

Fall Five Part 4

Happy Saturday.  Hope your weekend is going well.

Just a short post to share my fourth card of the Fall Five:


I was inspired by a card found on Pinterest.  I followed the link to the blog and the blogger asked that nothing from her site be reproduced, so I won't post the picture here.  But you can see the card that inspired me by visiting her blog here.

To make my card I started by heat embossing the leaf images.  I used Spellbinders Labels 14 die to mask off the area around the leaves and sponged colored ink over the image.  When I removed the die, I was left with the beautiful frame around the leaves.

I like the looked of heat embossed images, but I seem to get a lot of stray embossing powder left behind on my project.  I use this anti-static cling thing I got from a local stamp store (Stampin' Up makes one, too.  I think it's called the Embossing Buddy), but every once in awhile I'm still getting stray embossing powder sticking to my project.

 So my question is:  How do you keep "stray" embossing powder from sticking to your project?

Well, that's it for me today.  Enjoy and happy crafting!


Friday, September 14, 2012

The (Kind of) Great Outdoors

So I'm not really an outdoorsy kind of person.  Well, I'm not an outdoorsy person at all, really.  So the Card-a-Day Challenge (from several weeks ago) was to create an outdoor themed card.

I hemmed and hawed all morning to find something -- anything outdoorsy in my stash.  I came up a little empty handed.  The only thing I had were birds and butterflies.  They live outside; right?  So I went with the bird theme.

I used a sketch I found at Two Peas in a Bucket.  I was going to enter their Saturday card sketch, but time just got away from me.  Anyway...

Here's my card:


I have had the Happy Day collection from Echo Park sitting around unopened and unloved for a few months now.  So today was the day I finally got to cut into the fun papers!  I used three different papers for the banners and the strip.  I love that little bird paper it's so cute!

I added two of the coordinating bird stickers.  Everything on the card was flat so I decided to use a little foam adhesive to pop the birds a bit.  I added two of the coordinating flower stickers.  I felt they looked a little flat so I added a few gems to to make them sparkle!

I used a sentiment from PTI's Everyday Button and Bits, and stamped it on a punched tag that I trimmed down to look like a tag.

Well, now that puts me only two challenges behind.  I hope to be caught up by the end of the day, but that may be, well, a bit optimistic.

Thanks for stopping by, again, and happy crafting!

Paper Players Color Challenge 112

Happy Friday!

I just wanted to put a quick post to play along with the Paper Players Colour Challenge #112.

These are the colors for this challenge:

And here is my card:


I tried so many different things before landing on this layout.  I like it because it's clean and simple.  I used a gray card base and rounded the corners.  I stamped the chandelier image from Hero Arts in Versamark Ink onto blue paper and heat embossed it with clear embossing powder.  I then used the coordinating Sizzix die to cut it out.  Finally I heat embossed the sentiment in black to give it a little shine.

I liked this concept so much I made a few more cards so that I could have a little set of cards to give away as a gift.  These are the other two designs in the set:


Well, that's it for this challenge.  It sure was fun.  Be sure to visit the Paper Players website to play along!  Enjoy and happy crafting!

Wednesday, September 12, 2012

Fall Five Part 3

Happy hump day!  This is a wonderful Wednesday for me because I just turned in over 500 pages worth of transcript!  Woo-hoo!  I can't even begin to tell you how glad I am to have that finished and off my plate!   It's like a weight has been lifted off my shoulder, no joke.  Now I get a few days to play and craft before another hectic week of work descends upon me.

So anyways, back to the Fall Five:


Can you tell I like this owl DP, because I do!  I think the owls are just darling.  I trimmed a few flags out of scraps I had laying around  and added the sentiment banner from Pebbles.    

I have to tell you, I purchased the Pebbles Banner Stamp set on a whim.  I needed to add a few more dollars to an online order to qualify for free shipping (I mean, why use your money to pay for shipping, when you can get more goodies for your stash; right?!?!)  So I purchased this little set.  And I have used this set of stamps obsessively since it arrived!  Don't you just love it when impulse buys work out so well?

Well, that's it from me for today.  Thanks for stopping by and happy crafting!


Tuesday, September 11, 2012

Fall Five Part 2

On to Post 2 of the Fall Five.


I started by punching a bunch of squares out of a few different papers.  I adhered all the squares to a scrap piece of cardstock, which I die cut into shape.  I think it turned out pretty cute.  I love the little owl.  And I lined up the Pebbles "miss you" stamp to draw your eye right to it.

I wish I could take credit for this wonderful "quilted" die cut shape, but I really saw the idea on Pinterest.  I found this little beauty:


card

According to Pinterest it came from a blog called Sending Hugs by Lin.  There was no direct link to this specific card, but you can click here to go to this blog.

So thanks, Lin, for the fantastic idea!

Well, that's it for me today.  Enjoy and happy crafting!

Monday, September 10, 2012

Fall Five Part 1

I don't know about you, but I can't believe it's September already.  How time flies!  I love the idea of cool mornings and warm cozy evenings, especially after the heat waves we've endured this summer.

To celebrate the coming of the changing season, I'm going to focus on fall cards (think trees, leaves, Thanksgiving, etc.) for the next five posts and calling it the Fall Five.

Here's my first card for the Fall Five:


I fell in love with Papertrey Ink's Friendship Jar set, but I just couldn't justify the cost for all the versions.  So I found this little jar by Inkadinkado at Michael's for a fraction of PTI's.  

I tried my hand at paper piecing, which I really need a little more practice at. (Pay no attention to the white showing through :) )  The DP is from a fall stack I picked up at Target for a dollar,  It's been sitting in my stash for quite some time, so I was happy to use...finally.

Here's hoping cooler days and cozy evenings will soon be upon us!  Happy crafting!


Saturday, September 8, 2012

A Little Halloween Inspiration

Can you believe it's already Septemeber!  That means that Halloween prep is in full swing around our home. Halloween is my husband's favorite holiday, so he's been busy preping for Halloween since the middle of August, God bless his heart!

To get in on the spirit of Halloween, I've put together a few more Halloween cards.


So that's it for this little post.  Thanks for stopping by and Happy Crafting!

Friday, September 7, 2012

With a Cherry on Top

Meet today's card.


As summer is winding down, I wanted to make one last ditch effort to capture that relaxed, lazy summer day feeling.  

I used Papertrey Ink's Everyday Button Bits to stamp the cherry stem and leaves.  I didn't have buttons that fit the design so I turned to my favorite Fiskars mini heart punch and some red and white gingham paper.  And who would have known, but the heart's size was PERFECT!

I stamped the matching sentiment on a yellow and white gingham flag and added a little bling.
The card base is a some denim patterned cardstock from my stash (in other words, I couldn't tell you who the manufacturer is, sorry :)) with a gingham strip to anchor the card's design.

And there you have it, one more quick and simple card.

Happy crafting.

Welcome, Welcome!


Did you find the new place okay?  Great!

I'm so glad you're here!  Please be patient with me as I get the boxes unpacked and the new place set up.  I'm pretty sure there were will be some tweaks and changes made as I make myself at home.  And I will definitely be looking to all you other Blogger users for some insight to get everything up and running properly.

Anyway, thanks so much for stopping by, and I look forward to sharing many great posts with you!

A Tweet Little Card


Just stopping in with a quick post of a card that I created awhile back.  This card was super simple to make. I used DCWV Homespun stack to create this little card.  I loved the little bird and "stitched" flowers and sentiment, so I used it as the base of my card.  To add a little extra interest I fussy-cut and layered the different elements of the bird to create some dimension.  


I used some of the cheery striped paper as a border on the top and bottom of the card.  I added some blue Martha Stewart "washi" tape on the card's spine to finish off the entire card.

Well, that's it for now.  Happy crafting!